
CHATTERBOX QUILTS’ BLOG
Helping Quilters Learn and Improve
2024 Island Batik Ambassador Wrap-Up!
2024 is done and I wanted to share the projects that I created last year (!) in my first year as an Island Batik Ambassador.
I really enjoyed the challenges that being an Island Batik Ambassador gave me - I looked at them as creative opportunities.
Yes, it was a bit tough to keep up with the projects during the year. 😫
Yes, I sometimes struggled to come up with ideas for the various projects 🤔 but…
a big YES! I learned so much and really appreciated the chance to step out of my comfort zone and learn new techniques this past year! 😁
I have to say a big THANK YOU! to Island Batik and their sponsors, Hobbs Quilt Batting, Oliso, Aurifil Threads, Schmetz Needles, Funky Friends Factory, ByAnnie.com, and Studio 180 Designs for providing me with this opportunity and for sharing their amazing products with me and the other Ambassadors. ❤️
Here are the projects that I created as a 2024 Island Batik Ambassador:

Far Out Log Cabin Project for February 2024 (original design)

Creative Directions for March 2024 (original design)

Mickey the Moose (and Salem!) for April 2024 (Pattern from Funky Friends Factory)

Christmas in the Grove for May 2024 (original design - to be quilted)

Flying Diamonds for June 2024 (original design)

Fox in a Box for August 2024 (Pattern by Jeni Baker from the Fun-Size Quilts book)

Playful Sunflowers for September 2024 (original design)

Ditty Bag 2.0 for October 2024 (Pattern from ByAnnie.com

Blossoms in the Midnight Garden for November 2024 (original design - to be quilted
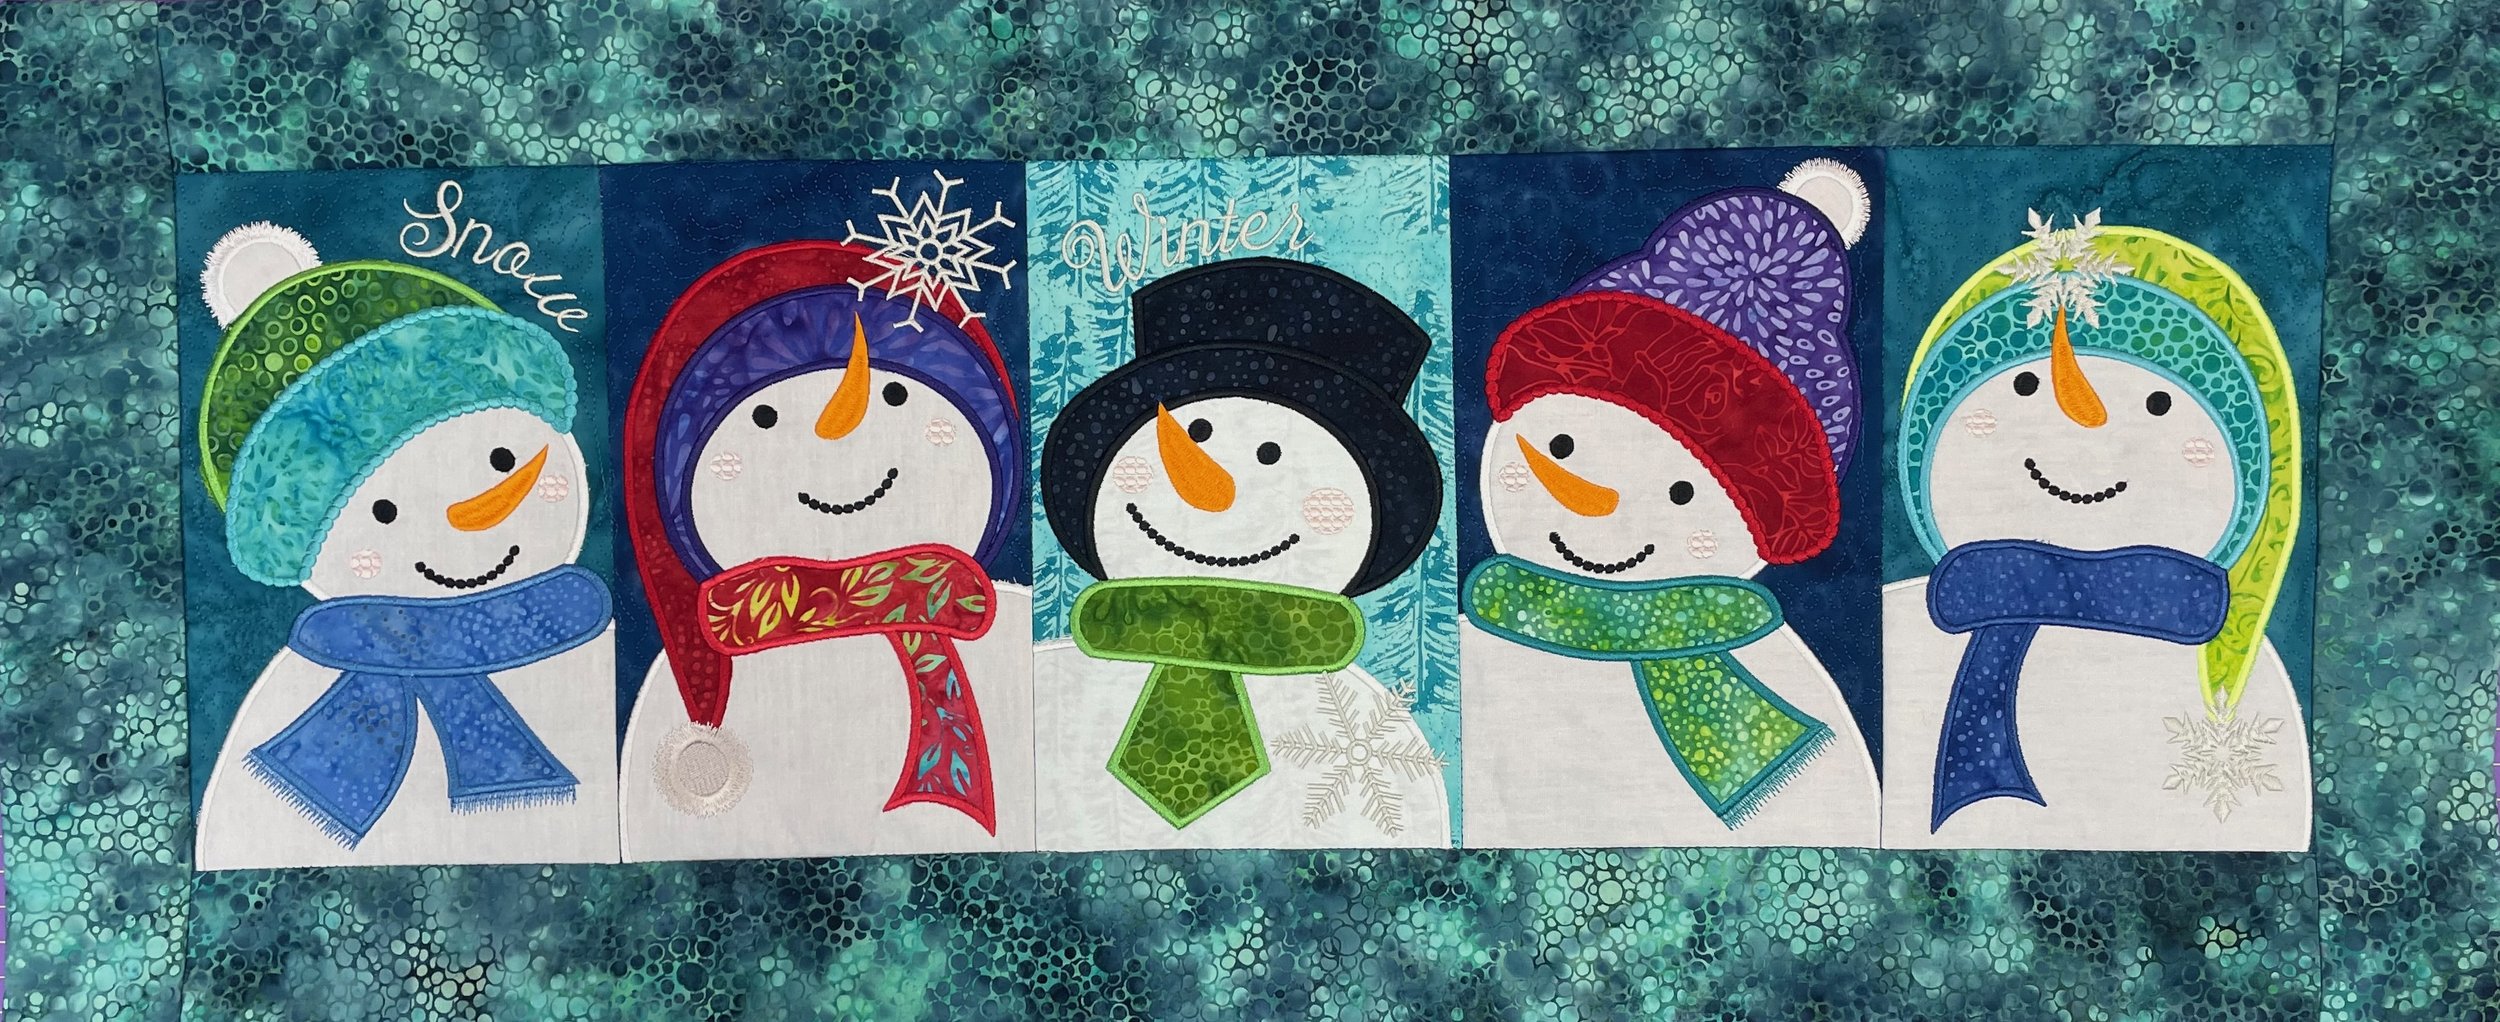
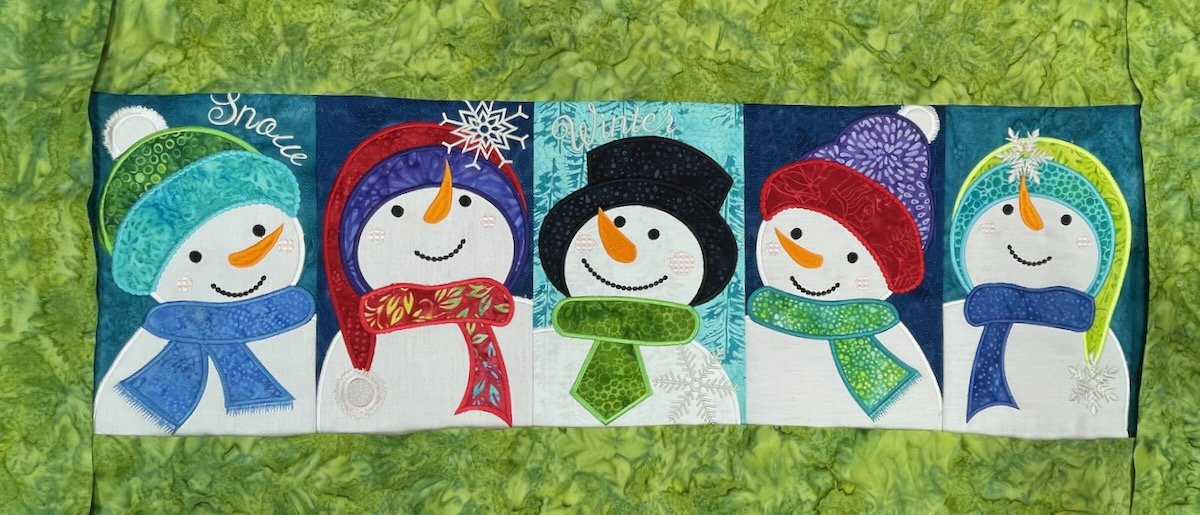
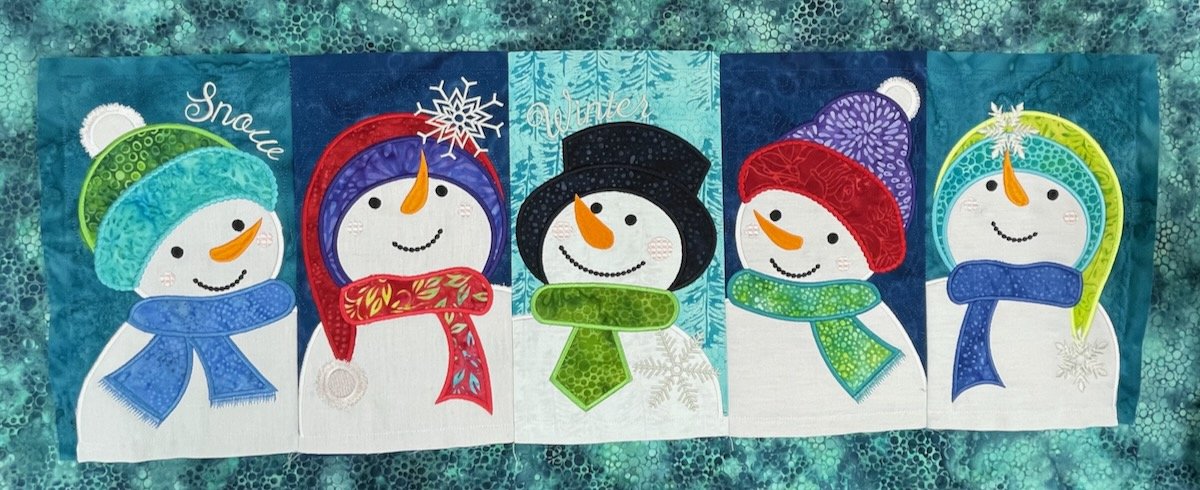
Let it Snow table runner for December 2024 (Pattern from Sweet Pea Machine Embroidery)
Also, be sure to check out the other Island Batik Ambassadors’ blogs to see what they created in 2024. You can find them at:
Brenda Alburl ~ Songbird Designs
Renee Atkinson ~ Pink Tulip Quilting
Megan Best ~ BestQuilter
Pamela Boatright ~ PamelaQuilts
Susan Deshensky ~ Lady Blue Quilts Studio
Brittany Fisher ~ Bobbin with Brittany
Preeti Harris ~ Sew Preeti Quilts
Mania Hatziioannidi ~ Mania for quilts
Jane Hauprich ~ Stitch by Stitch Custom Quilting
Victoria Johnson ~ Forever Quilting for You
Connie Kauffman ~ Kauffman Designs
Connie Kresin Campbell ~ Freemotion by the River
Emily Leachman ~ The Darling Dogwood
Denise Looney ~ A Quiltery
Leah Malasky ~ Quilted Delights
Maryellen McAuliffe ~ Mary Mack Made Mine
Lisa Pickering ~ Lisa’s Quilting Passion
Sarah Pitcher ~ Pitcher’s Boutique
Lana Russel ~ Lana Quilts
Julia Schweri ~ Inflorescence Designs
Gail Sheppard ~ Quilting Gail
Carol Stanek ~ Stitch with Color
Sandra Starley ~ Textile Time Travels
Jennifer Thomas ~ Curlicue Creations
Suzy Webster ~ Websterquilt
Note: The products featured in this blogpost were given to me by Island Batik and their sponsors. Thank you!
#islandbatik #islandbatikambassador #loveislandbatik #createwitholiso #olisoconnects #hobbsbattinginside #schmetzneedles #funkyfriendsfactory #byannie.com #patternsbyannie #aurifilthread #studio180designs
I Can Do Whatever I Want!

This month the challenge for Island Batik Ambassadors is…to make whatever project we want to using Island Batik fabrics. Okay, so I can’t do whatever I want, except with this project! 😉
Sometimes being able to do any quilting project I want can be more challenging than following the guidelines that Island Batik usually provides for the Ambassadors.
As I tend to overthink everything, I decided that I wouldn’t do that this time but what I would do is make a project that has been on my personal “to make” list already.
One of the projects that I have always wanted to make is a machine embroidery table runner from Sweet Pea Machine Embroidery called “Let it Snow”. I love making these type of in the hoop (ITH) projects as you only have to do a minimal amount of sewing after the project is embroidered.

While the sample pattern showed the snowmen all in various blue fabrics, I knew that I was going to be choosing lots of bright Island Batik fabrics to dress these gents. Picking out the appliqué fabrics is always the most fun for these types of projects (at least for me!).
I headed into my Island Batik fabric stash to start pulling fabrics and here are the ones I chose.

Now to decide where to put these fabrics! Once I had decided on the fabric arrangements, it was time to start stitching and here are a few of the snowmen in progress.


Once each individual snowman panel was stitched out, it was time to choose the border fabric and this was another opportunity to overthink! 🤣
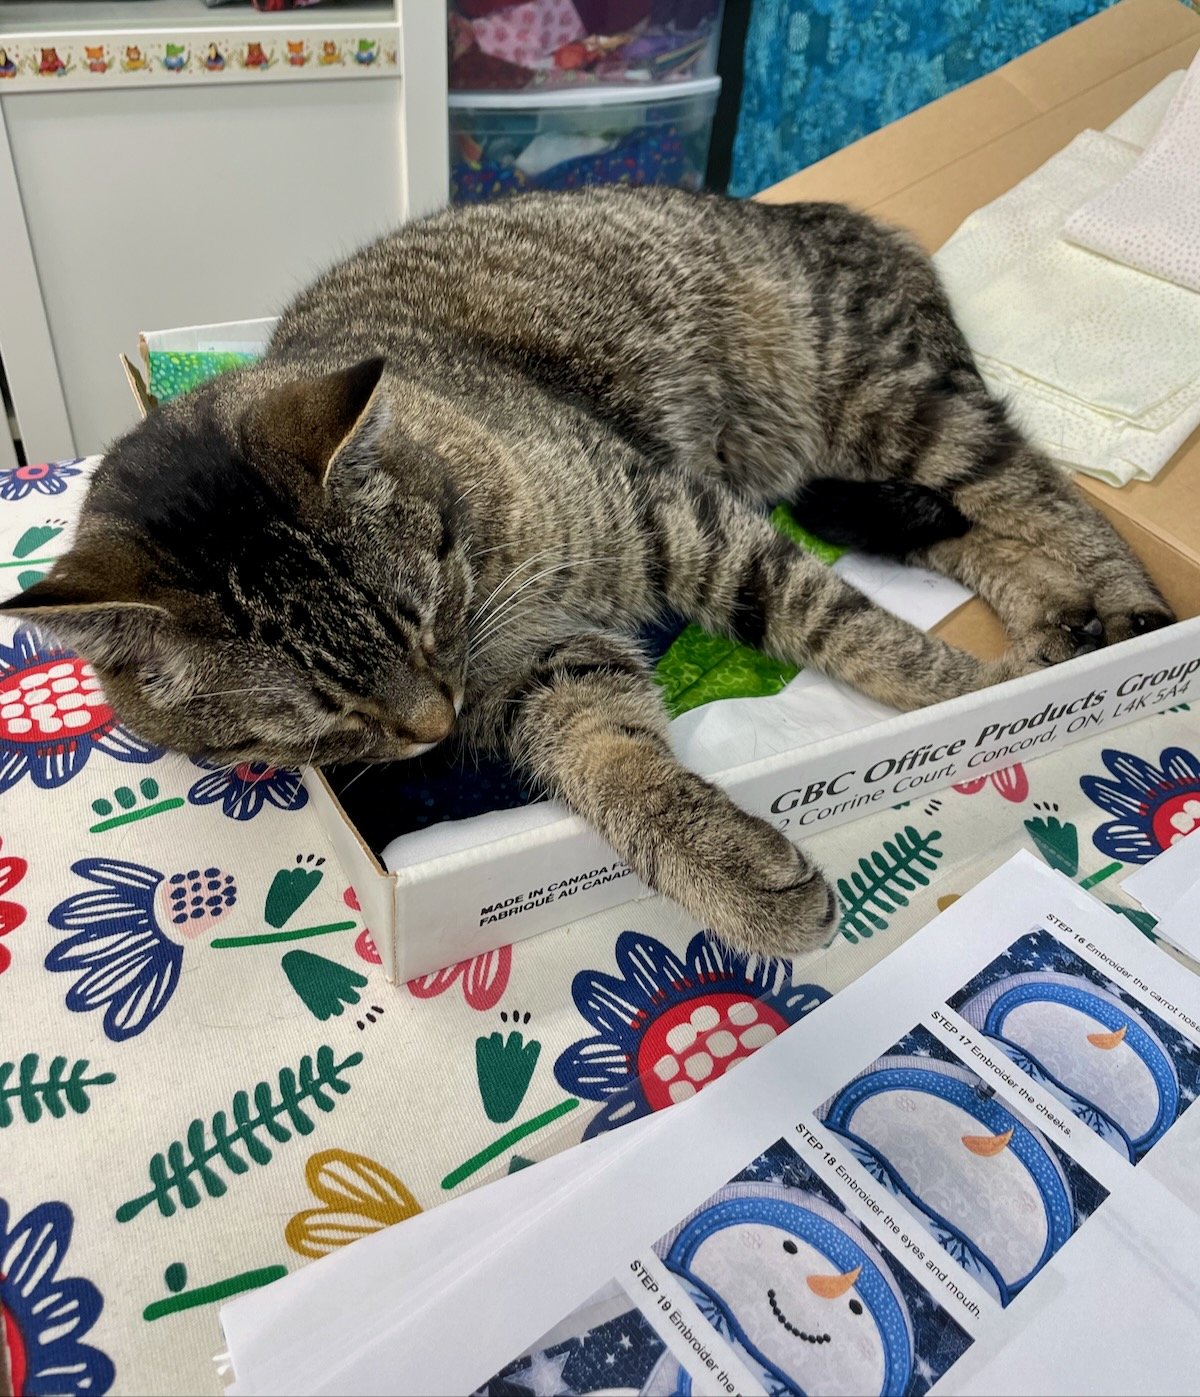
I decided to ask for some input from my purry assistant, Victor, but he was of little help…
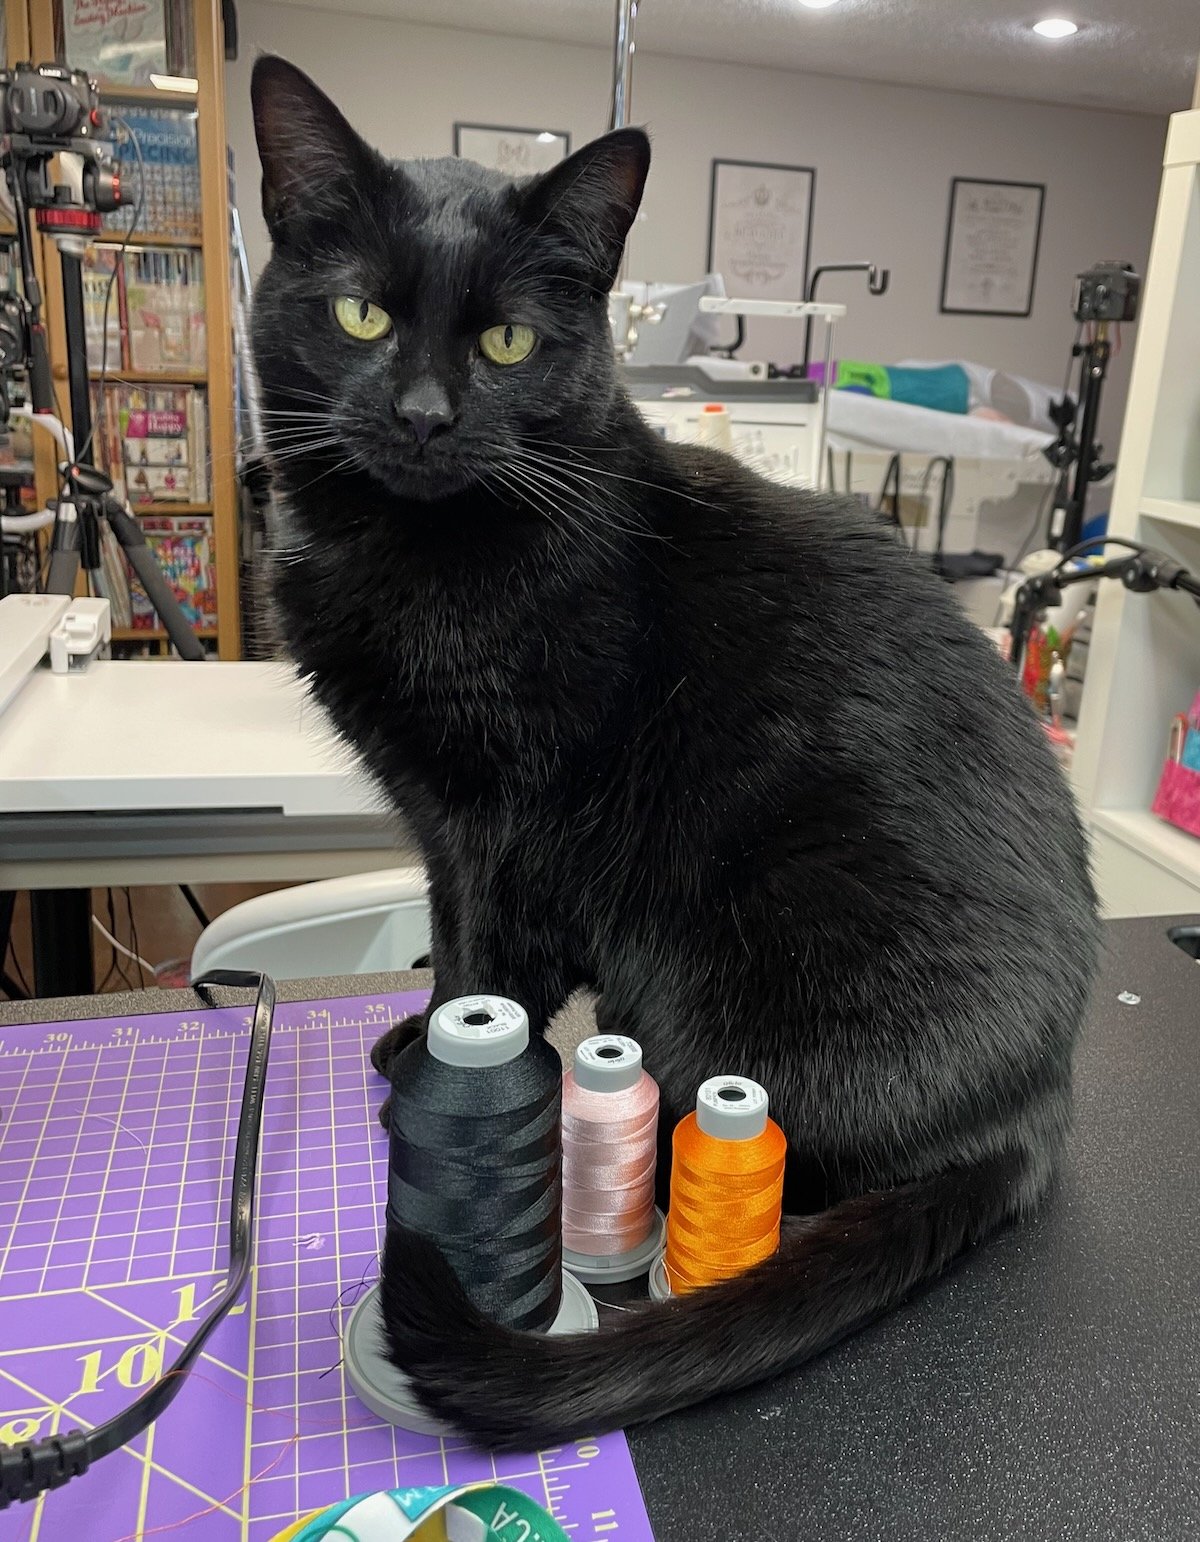
and Salem was clearly only on thread duty.
So, I did what I often do when I can’t decide on a border fabric: I lay out one potential border fabric, snap a pic and do the same with any other fabrics that I’m considering. This allows me to step away from the project and view the choice objectively.
Fabric #1 or
Fabric #2?
I chose to use the aqua print from The Grove fabric collection although the green was also very nice.
I cut the border fabric as well as batting strips and then stitched these around the table runner. My Oliso iron was very helpful in pressing down these thicker-than-normal fabric pieces. I used Hobbs Premium 80/20 batting for the table runner construction.
I added the backing using the pillowcase method and then did some stitch in the ditch around the individual panels and the border to connect the backing.
And it was done!
I think it turned out very well and I love how the beautiful Island Batik fabrics really make this design pop.
I’m really looking forward to seeing what projects my fellow Island Batik Ambassadors will be sharing this month. I’ll be adding them to my Pinterest board so be sure to check that frequently to view all of the December projects.
Also, be sure to check out the other Island Batik Ambassadors’ blogs to see what else they’re creating. You can find them at:
Brenda Alburl ~ Songbird Designs
Renee Atkinson ~ Pink Tulip Quilting
Megan Best ~ BestQuilter
Pamela Boatright ~ PamelaQuilts
Susan Deshensky ~ Lady Blue Quilts Studio
Brittany Fisher ~ Bobbin with Brittany
Preeti Harris ~ Sew Preeti Quilts
Mania Hatziioannidi ~ Mania for quilts
Jane Hauprich ~ Stitch by Stitch Custom Quilting
Victoria Johnson ~ Forever Quilting for You
Connie Kauffman ~ Kauffman Designs
Connie Kresin Campbell ~ Freemotion by the River
Emily Leachman ~ The Darling Dogwood
Denise Looney ~ A Quiltery
Leah Malasky ~ Quilted Delights
Maryellen McAuliffe ~ Mary Mack Made Mine
Lisa Pickering ~ Lisa’s Quilting Passion
Sarah Pitcher ~ Pitcher’s Boutique
Lana Russel ~ Lana Quilts
Julia Schweri ~ Inflorescence Designs
Gail Sheppard ~ Quilting Gail
Carol Stanek ~ Stitch with Color
Sandra Starley ~ Textile Time Travels
Jennifer Thomas ~ Curlicue Creations
Suzy Webster ~ Websterquilt
Be sure you’re following me on Facebook and Instagram so you won’t miss out on what I’ll be creating next with Island Batik fabrics!
Note: The products featured in this blogpost were given to me by Island Batik. Thank you!
I’m an affiliate for Sweet Pea Machine Embroidery and, when you purchase items through my affiliate link, I receive a small amount of compensation. Thanks for supporting my small business. ❤️
#islandbatik #islandbatikambassador #loveislandbatik #createwitholiso #olisoconnects #hobbsbattinginside #itsalluptoyouchallenge
Island Batik Dresden Plate Blog Hop - Finally Finished (Almost)!

I’ve finally (almost) finished my entry in the Island Batik Dresden Plate blog hop and I’m excited to share the details of Butterflies Blossoms in the Midnight Garden with you. Yes, I decided to change the project name as I made a few changes to the design - it’s a tendency that I have that I really need to curb! 😉
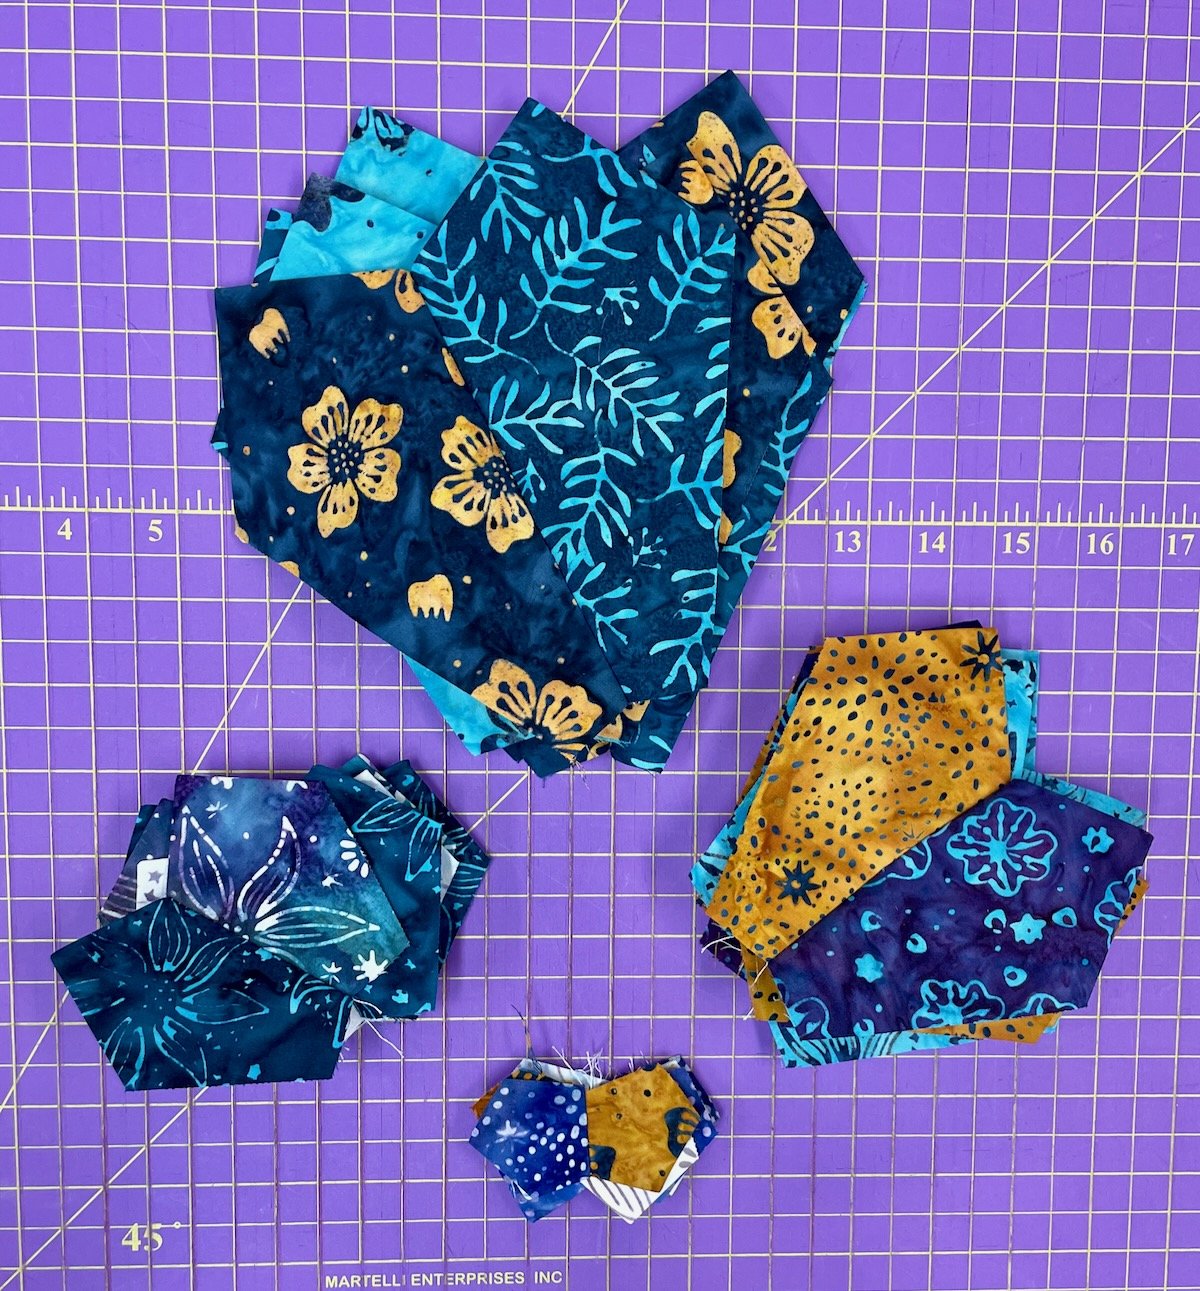
For this project, I used the Midnight Garden fabric collection by Jerry Khiev for Island Batik. The beautiful fabrics and rich colours inspired me to create a design that used some traditional Dresden Plate blocks as well as some additional not-so-traditional ones.
The challenge for Ambassadors is always to use as many fabrics in each collection as possible and I was able to use most of these fabrics in Blossoms in the Midnight Garden.

I started by pressing all my fabrics with my Oliso iron so that they were all set to cut.

My design had 4 traditional Dresden Plate blocks and 2 non-traditional Dresden Plate blocks – more details on these later in this post. I sorted my fabrics so that all of the ones in each Dresden Plate block were together - I find this makes it easier for cutting and to avoid any errors (at least in putting the selected fabrics together into each specific block!).
While I could have used a different fabric in each blade in each block, I instead chose 3 fabrics to use in each Dresden Plate block. As each Dresden Plate block had 12 blades, this meant that I would be cutting 4 blades from each fabric for each block. I double-checked to ensure that I had all of the correct fabrics together before I started to cut out the fan blades - and I checked my quilt math too.
When cutting out Dresden Plate blades, I like to use my Martelli 12” Flower template. This is a 30 degree template which means that I would need to cut 12 blades to create each complete Dresden Plate block (circle). How do I know this? Because I can do quilt math - sometimes! 😉

Okay, for you math nerds: A circle (a full Dresden Plate block) is 360 degrees so you just divide this figure by the degree of the template you are using (most are 18 or 30 degrees) to calculate the number of blades you’ll need to make a complete Dresden Plate block. In my example, 360 divided by 30 is 12 so I knew that I would need 12 blades to make a complete circle. Easy, right?! 🧐
Okay, so I knew that I would need to have 12 blades for each Dresden Plate block and I needed 4 traditional Dresden Plate blocks (more on these later) but I also added 2 non-traditional blocks - this is where I deviated from the original design. I wanted to add 2 blocks that had 6 fan blades and 6 flat blades. This required a little more quilt math, or, to be precise, some trial and error. I decided on the length to cut the fan blades and made these and then I used these blades to determine the length to cut the flat blades.

Fan and flat blades
These flat blades are actually the same as how you cut the fan blades, you just stitch the flat blades down as they were cut to use them in your design rather than creating a fan blade.

Flat blade cut out
I created 4 different size traditional Dresden Plate blocks by cutting and creating fan blades of different lengths and then stitching the appropriate blades together into pairs.

Fan blades ready to be stitched into Dresden Plate blocks
Stitching fan blades into pairs
I used Aurifil thread and a Schmetz needle for stitching up each blade.
To get more details on creating traditional Dresden Plate blocks, click here.
The 2 non-traditional Dresden Plate blocks were created with a combination of flat and fan blades and I made both of these the same size – about 9”.

Non-traditional Dresden Plate block
Of course I needed a background for all of these Dresden Plate blocks and I chose to use Island Batik Almond (one of their blender fabrics) rather than just a solid fabric. This gives a bit of texture without distracting from the main focus - the beautiful fabrics in the Midnight Garden collection!
I pieced the background together and then it was time to arrange the appliqués on it. Yes, when making a Dresden Plate block, you appliqué the Dresden Plate circle to the background fabric and then add the center circle. I like to use a glue stick to affix the blocks to the background to keep them in place.
My favourite stitch to use when appliquing is a narrow and short zigzag stitch. I chose a dark purple thread for all of the blocks and adjusted the width of the zigzag stitch to be proportional to the size of the block.
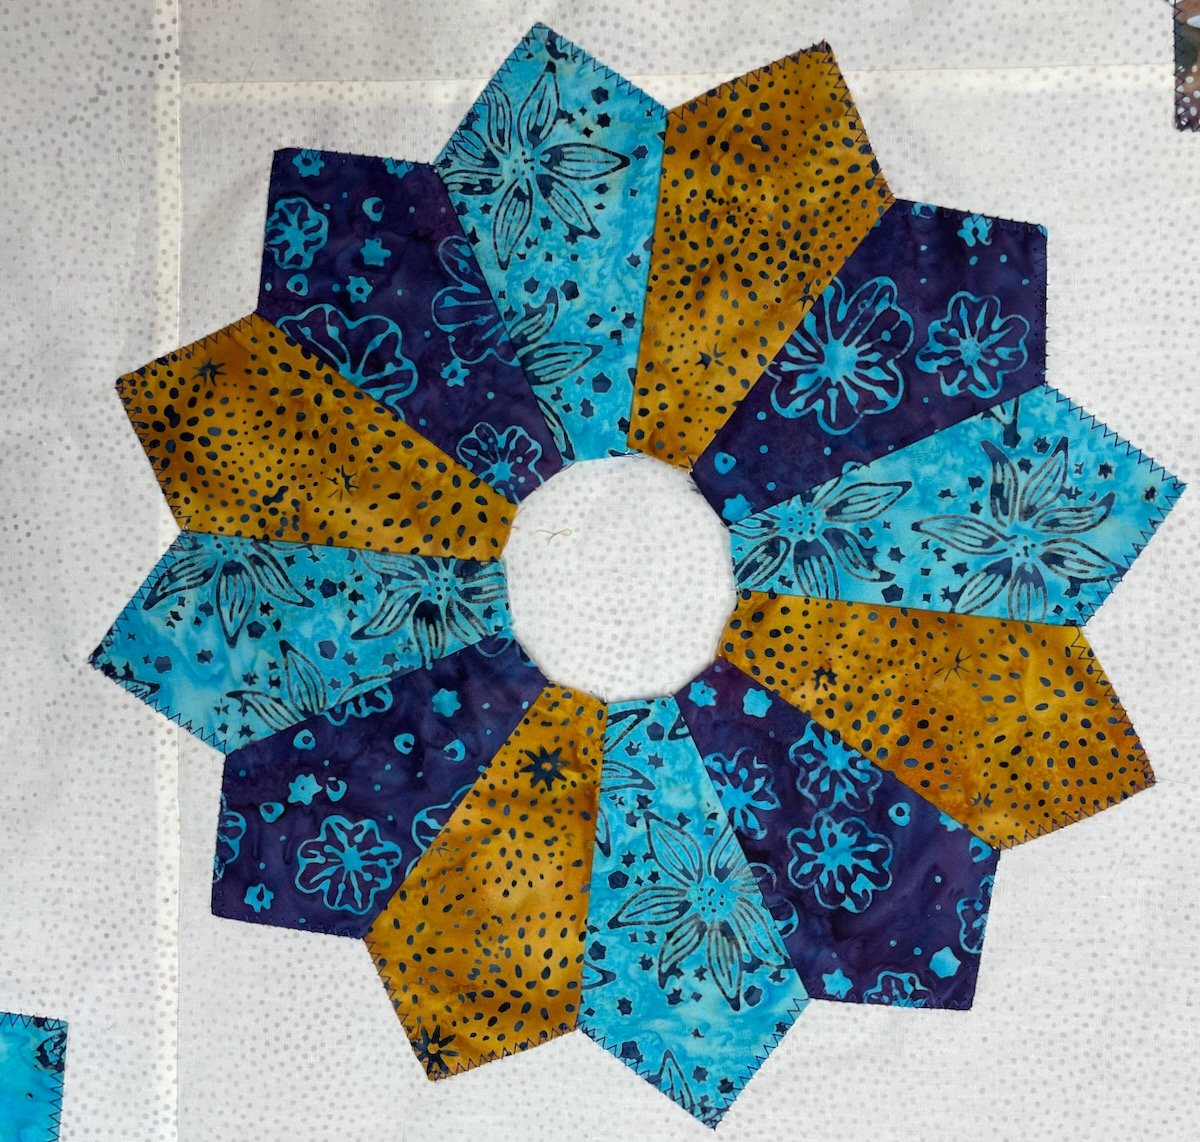
Traditional Dresden Plate block appliquéd in place
Once all of the Dresden Plate blocks were stitched down, the next step was to add the center circles. Here’s where I learned something new! When looking at the different sizes of Dresden Plate blocks, it looks like the center circles are also different sizes but this isn’t accurate 😳. All of the center circles are the same size – 3½” when using the template I used.
I cut out 6 fabric squares 4½”, fused a square of 4½” fusible web behind each of them and then added 2 layers of tear away stabilizer behind the background fabric where the circles would be.

Fabric square for center circle with fusible on it along with 2 layers of tear away stabilizer
I then used my Janome Circular Sewing Attachment to stitch a 3½” circle with a straight stitch in the center of each Dresden Plate block.

Center circle stitched in middle of Dresden Plate block and trimming started
I then trimmed the excess away from the stitched circle and then continued on to stitch a satin stitch around the raw edges of all the circles. This gave a nice finish to the center circles.

Center circle finished with a satin stitch
Next I added two borders, using two of the fabrics from the Midnight Garden collection for the first border and Blueberry (one of Island Batik blenders) for the second border.
Here’s what the top looks like.

Blossoms in the Midnight Garden top
Unfortunately, I haven’t yet had time to quilt it 🥺 but that will be coming and I have lots of ideas for this quilt (cross hatch for the center circles?). 😀
Be sure to check out my Pinterest board to see all the other wonderful quilts created by my fellow Island Batik Ambassadors during this month’s Dresden Plate bloghop.
Also, be sure to check out the other Island Batik Ambassadors’ blogs to see what else they’re creating. You can find them at:
Brenda Alburl ~ Songbird Designs
Renee Atkinson ~ Pink Tulip Quilting
Megan Best ~ BestQuilter
Pamela Boatright ~ PamelaQuilts
Susan Deshensky ~ Lady Blue Quilts Studio
Brittany Fisher ~ Bobbin with Brittany
Preeti Harris ~ Sew Preeti Quilts
Mania Hatziioannidi ~ Mania for quilts
Jane Hauprich ~ Stitch by Stitch Custom Quilting
Victoria Johnson ~ Forever Quilting for You
Connie Kauffman ~ Kauffman Designs
Connie Kresin Campbell ~ Freemotion by the River
Emily Leachman ~ The Darling Dogwood
Denise Looney ~ A Quiltery
Leah Malasky ~ Quilted Delights
Maryellen McAuliffe ~ Mary Mack Made Mine
Lisa Pickering ~ Lisa’s Quilting Passion
Sarah Pitcher ~ Pitcher’s Boutique
Lana Russel ~ Lana Quilts
Julia Schweri ~ Inflorescence Designs
Gail Sheppard ~ Quilting Gail
Carol Stanek ~ Stitch with Color
Sandra Starley ~ Textile Time Travels
Jennifer Thomas ~ Curlicue Creations
Suzy Webster ~ Websterquilt
Be sure you’re following me on Facebook and Instagram so you won’t miss out on what I’ll be creating next with Island Batik fabrics!
Note: The products featured in this blogpost were given to me by Island Batik and their sponsors. Thank you!
#islandbatik #islandbatikambassador #loveislandbatik #createwitholiso #olisoconnects #schmetz #aurifil #hobbsbattinginside #dresdenplatebloghop
Dresden Plate Blog Hop
This month the challenge for Island Batik Ambassadors was to create a Dresden Plate quilt project using the latest fabric collections from Summer 2024. We received these fabrics in a “surprise” package in our last shipment from Island Batik.

The fabric I received to use was Midnight Garden by Jerry Khiev for Island Batik and I loved the various colours and patterns in this collection and had lots of ideas as to what I could create with it.

Here’s a closer look at the gorgeous fabrics in the Midnight Garden collection that I was so excited to work with.
I love to make Dresden Plate projects and was really looking forward to working with this beautiful fabric collection however I encountered a slight hiccup - I was out of the country for several weeks on vacation so my project is a bit late but…better late than never, right?! 😉
Once I had the fabric, I just had to create a pattern using Dresden Plate blocks. I had lots of ideas but finally settled on the Butterflies in the Midnight Garden one that I designed in EQ8. Here’s an overview of the project that I created in EQ8.

I like designing in EQ8 as it allows me to upload and use the actual fabrics that I will be choosing for the “real” quilt. This gives me a good idea of what the final effect will be and allows me to change some details, if required. I don’t always include all of the finer details - such as the circles that will be in the centre of the Dresden Plate blocks - but just enough to get me going on creating the quilt.
I love the versatility of Dresden Plate blocks: you don’t have to use a full circle, but can use half and quarter circles, as I did to make the “butterflies” in the quilt. There are so many options with this block as you’ve already seen with the amazing creations from other Island Batik Ambassadors.
Now that I’m back and recovered from my vacation (with 3 countries, 8 flights (some with several hours delay) and multiple time changes, it took me a few days to get my feet back under me!), I’m hard at work making my Butterflies in the Midnight Garden for the Island Batik Ambassador blog hop and hope to share my creation with you soon.
Be sure to check out my Pinterest board to see all the other wonderful quilts created by my fellow Island Batik Ambassadors during this month’s Dresden Plate bloghop.
Also, be sure to check out the other Island Batik Ambassadors’ blogs to see what else they’re creating. You can find them at:
Brenda Alburl ~ Songbird Designs
Renee Atkinson ~ Pink Tulip Quilting
Megan Best ~ BestQuilter
Pamela Boatright ~ PamelaQuilts
Susan Deshensky ~ Lady Blue Quilts Studio
Brittany Fisher ~ Bobbin with Brittany
Preeti Harris ~ Sew Preeti Quilts
Mania Hatziioannidi ~ Mania for quilts
Jane Hauprich ~ Stitch by Stitch Custom Quilting
Victoria Johnson ~ Forever Quilting for You
Connie Kauffman ~ Kauffman Designs
Connie Kresin Campbell ~ Freemotion by the River
Emily Leachman ~ The Darling Dogwood
Denise Looney ~ A Quiltery
Leah Malasky ~ Quilted Delights
Maryellen McAuliffe ~ Mary Mack Made Mine
Lisa Pickering ~ Lisa’s Quilting Passion
Sarah Pitcher ~ Pitcher’s Boutique
Lana Russel ~ Lana Quilts
Julia Schweri ~ Inflorescence Designs
Gail Sheppard ~ Quilting Gail
Carol Stanek ~ Stitch with Color
Sandra Starley ~ Textile Time Travels
Jennifer Thomas ~ Curlicue Creations
Suzy Webster ~ Websterquilt
Be sure you’re following me on Facebook and Instagram so you won’t miss out on what I’ll be creating next with Island Batik fabrics!
Note: The products featured in this blogpost were given to me by Island Batik. Thank you!
#islandbatik #islandbatikambassador #loveislandbatik #createwitholiso #olisoconnects #schmetz #aurifil #hobbsbattinginside #dresdenplatebloghop
What's in my bag? The October 2024 Island Batik Ambassador Challenge

It’s October already - where did September go?! - and that means it’s time for another Island Batik Ambassador project! This month, it was the What’s in Your Bag? challenge.

The challenge for all Island Batik Ambassadors for October was to create a project using a pattern from ByAnnie.com. I’m sure you’ve heard of this company that makes amazing bag patterns and has all the hardware and notions required for their patterns.
Thanks to ByAnnie.com for providing us with not only the pattern but everything required to make our chosen project.

For me, not a bag maker, this challenge was a big step out of my comfort zone but I decided to keep it simple (and attainable) and chose to make the Ditty Bags 2.0 in the medium size. I figured even a beginner bag maker like me could handle this project.
Thankfully, ByAnnie,com provides lots of helpful videos to make their patterns so I was able to follow along with their video instructions as I created the Ditty Bags 2.0. There are Add-On Videos for many of their patterns and I found the one for this pattern very helpful.
I was able to choose the fabrics I wanted to use for this project and I again stepped out of my comfort zone and chose fabrics in colours that I normally wouldn’t use. It’s always a good idea to shake things up once in awhile! 😉

Obviously these fabrics are “Salem approved”
I chose some of the fabrics from the Flora Nova fabric collection from Island Batik because I thought they would make a bright and cheery project. Thanks to Island Batik for providing me with these fabrics.
It didn’t take many tools to create this bag and I made sure to get everything ready before I started but…

One thing I didn’t do was follow instructions exactly as they were written in the pattern - a bit of a mistake on my part. I usually do follow the pattern instructions but I thought I could do a bit better when adding the zipper but I should’ve followed Annie’s instructions - and not my own! Using clips was definitely the way to go - not using double-sided tape as I tried to do. It was only a slight misstep that I was able to quickly remedy before moving onto the next part of the construction process.
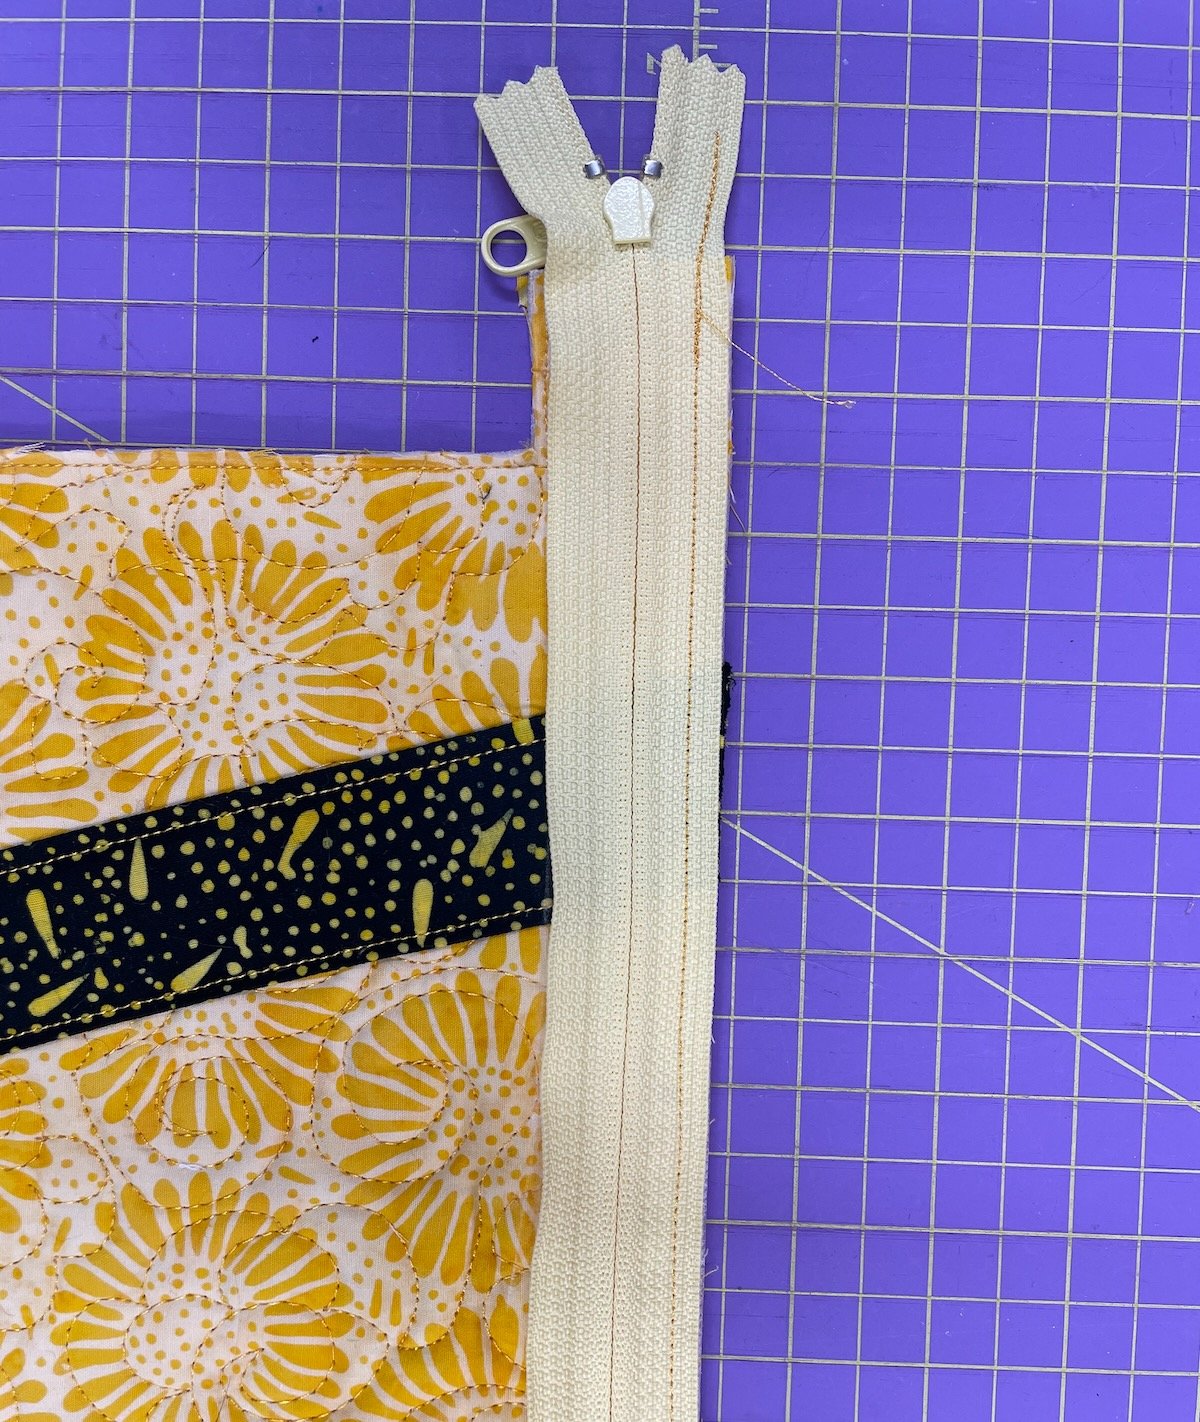
Clips, not double-sided tape, was the way to go when attaching the zipper due to the finishing technique used
I learned so many new-to-me bag making techniques when stitching up the Ditty Bags 2.0 project and I’m sure these will be helpful when (if) I tackle more complex patterns in the future. Even Salem was impressed by the end result (I think).

No treats in the Ditty Bag 2.0 for you, Salem!
For more information on what I learned when creating my version of the medium size of the Ditty Bags 2.0 pattern and how I personalized this design, check out my video below.

Be sure to check out my Chatterbox Quilt’s Facebook page to see all the other wonderful quilts created by my fellow Island Batik Ambassadors during this month’s What’s in Your Bag? challenge.
Also, be sure to check out the other Island Batik Ambassadors’ blogs to see what else they’re creating. You can find them at:
Brenda Alburl ~ Songbird Designs
Renee Atkinson ~ Pink Tulip Quilting
Megan Best ~ BestQuilter
Pamela Boatright ~ PamelaQuilts
Susan Deshensky ~ Lady Blue Quilts Studio
Brittany Fisher ~ Bobbin with Brittany
Preeti Harris ~ Sew Preeti Quilts
Mania Hatziioannidi ~ Mania for quilts
Jane Hauprich ~ Stitch by Stitch Custom Quilting
Victoria Johnson ~ Forever Quilting for You
Connie Kauffman ~ Kauffman Designs
Connie Kresin Campbell ~ Freemotion by the River
Emily Leachman ~ The Darling Dogwood
Denise Looney ~ A Quiltery
Leah Malasky ~ Quilted Delights
Maryellen McAuliffe ~ Mary Mack Made Mine
Lisa Pickering ~ Lisa’s Quilting Passion
Sarah Pitcher ~ Pitcher’s Boutique
Lana Russel ~ Lana Quilts
Julia Schweri ~ Inflorescence Designs
Gail Sheppard ~ Quilting Gail
Carol Stanek ~ Stitch with Color
Sandra Starley ~ Textile Time Travels
Jennifer Thomas ~ Curlicue Creations
Suzy Webster ~ Websterquilt
Be sure you’re following me on Facebook and Instagram so you won’t miss out on what I’ll be creating next with Island Batik fabrics!
Note: The products featured in this blogpost were given to me by Island Batik. Thank you!
#islandbatik #islandbatikambassador #loveislandbatik #createwitholiso #olisoconnects #ByAnnie #patternsbyannie

Welcome! I’m Kim Jamieson-Hirst of Chatterbox Quilts, a YouTube creator and host of The Quilter’s Way. I believe that quilting is more than just a 1/4” seam and that practice makes improvement and you are improving every day!
Contact me at kjh@chatterboxquilts.com.


Want to improve your quilting and have fun doing it? Join The Quilter's Way, a private online membership site that creates successful quilters.

Check out my favourite books and tools.
As an Amazon Associate I earn from qualifying purchases from links that you may find on the Chatterbox Quilts’ website.